How did I deal with…?
Programming Video Game Interaction Using a C++ Interface in Unreal Engine
The goal of this workflow development is to provide the player with an efficient interaction, using as few resources as possible on picking up collectibles inside the level. Here you can see the block out of your player character in front of a changing color collectible, from yellow to orange, indicating that it's ready to pickup.


These are the steps I'm taking to plan, test and implement my interaction:
Picking up item
I'm basing the interaction on events instead of casting functions to actors. To achieve that, I'm using an Interface (don't confuse with User Interface) and triggering delegates (Event Dispatchers in Blueprints).


One Page Design Document: Single Level
First of all, I am defining the interaction patterns in the game, using the project's gameplay as a template. This is how I am summarizing the general logic, using schematics from the One Page Design Document:


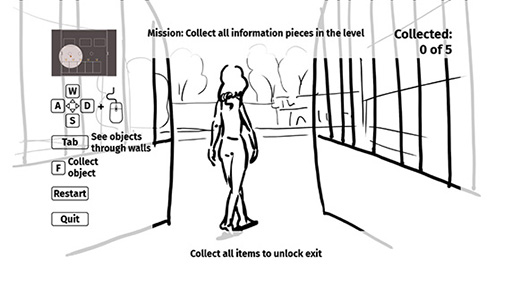
User Interface Prototype
All levels are going to share the same logic. Only the contents are going to be different, because each level represents a new city. I am drawing a prototype for the User Interface and a Storyboard, to define interactable regions and make the Gameplay's goals visible.


Storyboard


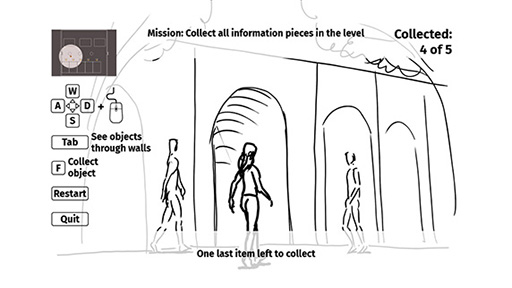


The storyboard is telling me which functions I am going to need for the interaction:
- Opening/closing doors
- Input actions system
- A set of pickup elements, and
- A counter to lock/unlock the exit gates and finish the mission.
C++ Logic Schematics
Now I am in the position to draw a schematics for the general logic of my future C++ version:


First, I am developing a prototype in Unreal Engine/Blueprints, to test the nodes:


In this BP sequence you can see the 4 functions I am triggering by pressing the “E” key interaction, namely:
Counter
Inside the prototype, I'm writing a counter that adds items every time I collect a pickup:


What I'm doing here is using the same interaction to update my UI via Interface. This is the translation for this first function in C++, in the source file of Player Character, Interact Function:
if (Interface && (MissionAccomplished == false))
{
	Interface->Execute_OnInteract(OverlappedActor, this);
	CollectedItems++;
	Add_Item.Broadcast();
}
At the end of the conditional, I'm replacing the interface through a delegate, which allows me to send different messages to the UI from C++, reserving the interface for interaction with the pickups only.
Checking out for Active Interface in Pickup
The second function loads up the pickups in the level to check out whether they are implementing the interface or not, leaving the ones with no active interface out of the loop:


This is the translation in the public section from header file of parent actor for pickup:
UFUNCTION(BlueprintNativeEvent, BlueprintCallable, Category = "Interaction")
	void OnInteract(AActor* Caller);
	virtual void OnInteract_Implementation(AActor* Caller);
Checking out One Item Left
The third function tells the UI that the player has only one item left (when the variable int Items equals the variable int TotalItems – 1) and sends a message via Event Dispatcher (future delegate):


This is the Source file in Player Character, Interact function:
if (CollectedItems == (TotalItems - 1))
	{
		Interact_OneToGo.Broadcast();
	}
This is the delegate definition in the header, triggering an event that pushes text changes in the UI Hints Panel.:
DECLARE_DYNAMIC_MULTICAST_DELEGATE(FHint);

UPROPERTY(BlueprintAssignable)
FHint Interact_OneToGo;
Checking out All Pickups Collected
The fourth and last function checks out whether all pickups in the level are collected by comparing the int CollectedItems variable and the int TotalItems variable (counting in Game Mode Actor from a Begin Play Event).


This last function is executing the following tasks:
- Stopping the player's ability to collect
- Labeling the mission as finished
- Unlocking exit gates, and
- Updating the UI text via interface.
This is the C++ translation, calling several delegates instead of using the interface. This method proved more efficient than the interface for updating UI after a couple of tests.
if (CollectedItems == TotalItems)
{
	CanPickup = false;
	MissionAccomplished = true;
	Mission_Accomplished.Broadcast();
	All_Pickups_Collected.Broadcast();
	Interact_Finished.Broadcast();
}
Interact Function
This is what the Interact Function declaration, in Player Character / protected section Header looks like:
void Interact(const FInputActionValue& Value);
And this is the implementation in source file:
void ASciFiProjCharacter::Interact(const FInputActionValue& Value)
{
	if (OverlappedActor && CanPickup)
	{
		IInteractInterface* Interface = Cast(OverlappedActor);

		if (Interface && (MissionAccomplished == false))
		{
			Interface->Execute_OnInteract(OverlappedActor, this);
			CollectedItems++;
			Add_Item.Broadcast();
		}
		if (CollectedItems == (TotalItems - 1))
		{
			Interact_OneToGo.Broadcast();
		}

		if (CollectedItems == TotalItems)
		{
			CanPickup = false;
			MissionAccomplished = true;
			Mission_Accomplished.Broadcast();
			All_Pickups_Collected.Broadcast();
			Interact_Finished.Broadcast();
		}
	}
	else
	{
		if (OverlappedActor == nullptr && CanPickup == false && MissionAccomplished == false)
		{
			Interact_Empty.Broadcast();
		}
		if (OverlappedActor == nullptr && CanPickup == false && MissionAccomplished == true)
		{
			Interact_Finished.Broadcast();
		}
	}
}
The advantage of using Interfaces and Delegates is that I am casting only once to the Interface. Because of that, my character's tick, references, and dependencies are clean and I am executing the interaction only when an Event takes place, rather than on a constant CPU/GPU effort through casting:
- The player character approaches the pickup, overlaps
- Pickup changes color and character can pickup
- UI sends a message
- You press “E”
- Counter updates, and
- UI writes messages/hints.
If we collect enough pickups, the TotalItems number is going to be equal to the number of CollectedItems:
- The event unlocks the exit gates
- UI sends “Mission Accomplished” messages, and
- Game Mode preps end screens.
If you want to see more examples of using programming in real and render time, click on the following case studies links:


