How did I deal with…?
Modeling Level Geometry for Interaction in Real Time Using 3D Studio Max
The goal of this project is to provide the player with several game levels, where they have to accomplish missions. This is what this prototype level looks like in real time at the block out stage (model place‑holders with functional programming):


The solutions I'm developing for this situation consist of the following tasks:
1. Pre‑production
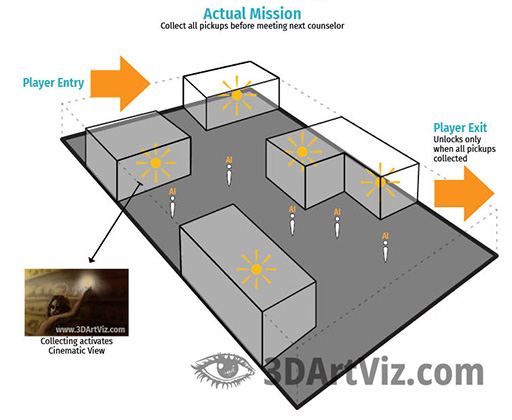
These missions consist of collecting certain information items and/or make it out of the level alive, meet a counselor afterwards, and moving on to the next level. This schematic from the One Page Design Document shows the general logic of the game.


Research
First of all, I need to block out the level I'm working on. At least the parts that are going to serve as interaction surface for my player character (she must be able to run, collide with walls, open doors, walk up stairs etc.). The first step is to decide what the architecture is going to look like. I'm inspiring the result of my research is an inspiration on ancient Persian architecture.
Floor plan and elevations
Only when I have a clear sight of the definitive look of my city, I am developing all buildings and prepping the environment. First, 2D shapes, floor plans and elevations, just like a regular architect (the same is also valid for characters, using orthographic views):


2. Block out
Using this floor plan as a template, I'm finding out the relative sizes of the buildings. Here you can see a comparison between block out and first detail pass on the exteriors:


I could use Unreal shapes for blocking out, but I want to keep the basic geometry in 3DS Max to use them as a template for the detailed versions. I'm exporting them using Datasmith, which gives me the flexibility to import them either as individual buildings or as a whole level into Unreal Engine.
Character block out
This is what this particular level looks like at the block out phase, including a block out of the player character:


I am blocking out my player character:
- Using a ZSphere basis
- Adding some fundamental detail using Dynamesh
- ZRemeshing
- Sending into Maya
- Mimicking the pose of the default 3rd person character in Unreal Engine
- Importing the rig from Unreal Engine, and
- Skinning to the FK joints.

After that, I can export the FBX from Maya into Unreal Engine:
- Retargeting
- reusing mocaps
- Using the default animation blueprints, and
- Input Actions for my block out model.
3. Modeling in 3D Studio Max
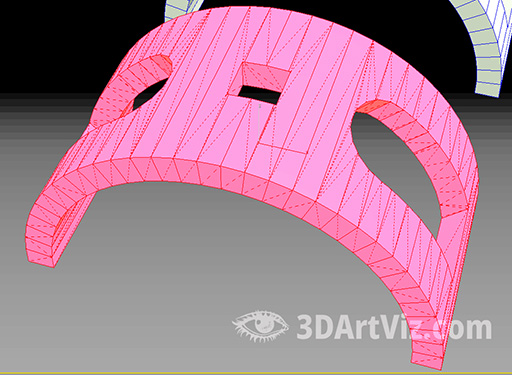
I am always testing my block out in the level before starting detailing the buildings. In this game, every level plays with a different city and shares the same modeling strategy for low poly architecture and floor. Surfaces are non deformable, which allows me to do without quads. 3D Studio Max algorithm solves the non‑quad issues by generating its own triangle solution, like in this case:


The picture above shows the triangles at face subobject level auto‑generated by 3DS Max's algorithm. I'm not caring about quads in this case, because I'm not modeling characters for animation, I'm modeling non‑deformable architecture.
Gym
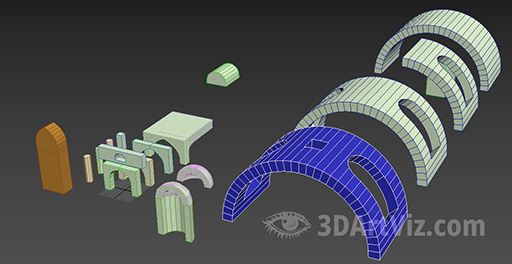
These shapes are all the geometry I need to distribute on my level. I know this because I let my pre‑production do the visualization before modeling.


Stacks
For the interiors and entry gates, I am using stacks. I am stacking modifiers to get the cheapest polygon count on every form, like in this case:


As you can see, I'm showing curvature only where it is absolutely necessary. This is an example of the stack construction process using booleans:


After the first detailing pass, I´m:
- Resetting Xform
- Collapsing the meshes, and
- Exporting selections using Datasmith
Datasmith guarantees that Unreal Engine will receive 1:1 vertices information.
Summary
This is what the geometry looks like (before UVW and texturing) uploaded into Unreal Engine:


As you can see, there are a couple of minimal optimization procedures that we can use – at least to begin with – before moving on into more detailed modeling, when prepping meshes for a level. These measures include:
- Making a pre‑production with floor plans and elevations
- Finding out whether and which surfaces are going to be deformable
- Using minimal polygon count
- Making a gym with modular pieces to re‑use whenever comes in handy
- Adhering to a consistent, tight nomenclature, and
- Keeping it simple.
A most important measure is uploading the block out in Unreal Engine as soon as possible, every time there is an update. This is going to be the template for all the detailed meshes later. We can test the geometry against interaction only when present in the level. The next step is texturing. For texturing environments in real time, please take a look at this case study:
For more modeling insights, please click on the following cards:
For pre‑production and visual development, take a look at these workflow descriptions:


